Plan Your Intricate Stitching Journey
Have you ever seen a beautiful embroidery design with lots of details and wondered how it was made? Intricate embroidery designs can look amazing, but sometimes they seem very hard to stitch. The secret is to make the design easy to stitch by planning and using the right tools. In this guide, we will learn simple steps to make even the most detailed patterns easier to work with. Plan carefully. Use an embroidery size chart. Ask for help from embroidery digitizing services in the USA. Choose great machine embroidery designs. This way, you can create beautiful art without feeling overwhelmed. Let’s start our stitching journey with a clear plan!
When you plan your project, first draw a rough sketch of your design. Look at all the small parts and see if there is any way to make them simpler. Think about which parts of your design are most important and which ones can be made bigger or less detailed. By planning, you will know what needs extra care and what can be done quickly.
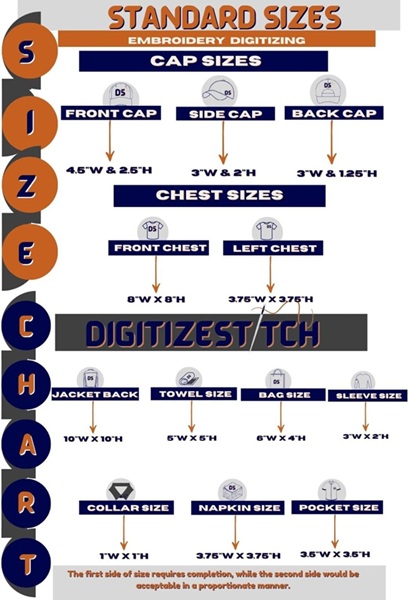
Use An Embroidery Size Chart
An embroidery size chart is a helpful tool that shows you what size your design should be for different items like shirts, hats, or bags. When you work on an intricate design, you must think about how big or small it will be stitched. A size chart helps you decide on the best measurements so that every little detail is visible, and nothing looks too crowded or too tiny.
For example, if you plan to embroider your design on a cap, the details might need to be a bit larger. But if you use a t-shirt, the design can be bigger, and the small parts will be easier to see. Look at the embroidery size chart to choose the right size for your project. This chart makes it easier to match the design with the item you are stitching on.
Ask For Help With Embroidery Digitizing Services USA
Sometimes, the design you have in your head looks great on paper but is hard to turn into a file that a machine can use. This is where embroidery digitizing services USA can help you. Experts turn your drawing into a digital format for your embroidery machine.
When you send your design to embroidery digitizing services USA, the experts look at all the details. They decide which parts can be simplified and which details should stay. Their work makes sure that the design will stitch out correctly on fabric. They remove any extra details that might confuse the machine and make sure the lines are clear and bold.
Pick The Right Colors And Threads
Choosing the right colors and threads is very important for making your design easy to stitch. When you work on an intricate design, bright and clear colors help make every part stand out. You should pick colors that go well together and are easy to see on the fabric. Before you start stitching, make a list of your colors. Look at the design and decide if some parts can use one color instead of many. Fewer colors can make your work simpler and faster to stitch. When the colors are simple, the embroidery machine can sew them with more accuracy.
It is also important to choose the right thread. Threads come in many types, like cotton, polyester, or silk. Each type of thread can change the look of your design. Ask for help at a local craft store or from an experienced stitcher to know which thread works best for your project. With the right colors and threads, even the most intricate design will look clear and bright.
Get A Good Idea With Easy Sketching
Before you start working on your embroidery machine, draw a simple sketch of your design on paper. Use a pencil and paper to plan how you want your final design to look. This step is important because it helps you see all the details and decide which parts might need to be made simpler.
When you sketch, think about the space each part of your design will take. Are there any parts that are too close together? Can you make some parts bigger so that they are easier to stitch? Adjust your drawing until you have a design that is both intricate and clear. This easy sketching step makes it simpler when you transfer your drawing to a digital file later on.
Use Machine Embroidery Designs For Help
Machine embroidery designs are created especially for embroidery machines. These designs are made to be stitched out perfectly by a machine. When you choose a ready-made machine embroidery design file, you are taking a big step to ensure that your work turns out well.
There are many websites and companies that offer machine embroidery designs. These designs are made by professionals who know how to simplify intricate details without losing the beauty of the design. By choosing a good machine embroidery design, you can save time and avoid mistakes that may happen when you try to digitize the design yourself.
Practice With A Small Sample
Before you work on a big project, it is smart to practice with a small sample. Testing your design on a little piece of fabric will show you if everything looks good. You can check if the colors are bright and the details are clear. This is a very important step because it helps you catch any problems before you stitch a whole shirt or bag.
When you practice, use the settings from your embroidery machine that you plan to use for the final design. Watch how the machine stitches the design and check if any parts are too hard to see or if the machine has trouble with tiny details. If you see any problems, go back to your drawing or ask for help from embroidery digitizing services USA to fix them.
Keep It Simple And Have Fun
Remember, simple designs can be easier to stitch. Intricate embroidery may look detailed, but simplicity often works best. When you simplify your design, you do not lose its beauty. Instead, you make it clear and easy for the machine to follow.
Think of your design as a picture that tells a story. Every part of the design should add something to that story, but if there are too many parts, the story might become confusing. By keeping the design simple, you let the main parts shine. This is a great lesson for any creative project.
Learn And Adjust As You Go
Every new project is a chance to learn something new. Sometimes, even with the best planning, things might not go as expected. That is okay! Look at your work and see what you can change to make it better next time. Maybe a line needs to be thicker, or a color needs to be brighter. Use what you learn from each project to improve your next one.
If you run into problems, remember the tools and help available to you. Use your embroidery size chart to adjust the size of your design. If the machine is having trouble, you might need to call on embroidery digitizing services USA to fix the file. Look at other machine embroidery designs for ideas and inspiration. Each project makes you a better stitcher.
Final Thoughts On Easy Stitching
Making intricate embroidery designs easy to stitch is all about planning, using the right tools, and practicing a lot. Start with a clear plan and a simple sketch. Use an embroidery size chart to choose the right measurements for your design on different items. When your design is ready, ask embroidery digitizing services USA for help. They can turn your art into a file that your machine can read.
Remember to choose the right colors and threads, and take a look at machine embroidery designs to see how the experts do it. Practice on a small sample first, and adjust your design as needed. Every mistake is a chance to learn and improve your skills.


Leave a Reply